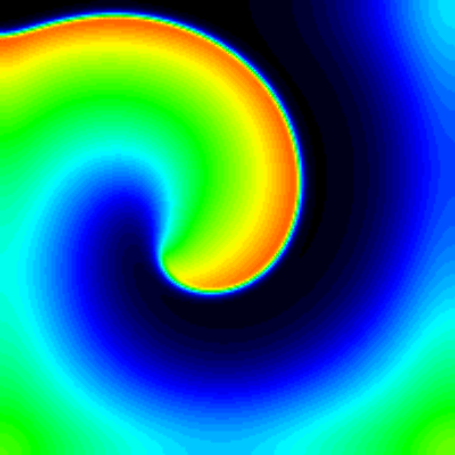
Documentation for Release 2024.2
Cardiac electrophysiology: spiral wave
This tutorial was generated from the file TestSpiralWaveLiteratePaper.hpp. Note that the code is given in full at the bottom of the page.

On this wiki page we describe in detail the code that is used to run this example from the paper.
Here we use a domain and model suggested in the paper Qu et al. “Origins of spiral wave meander and breakup in a two-dimensional cardiac tissue model” Annals of biomedical engineering. 28(7):755-771 (2000) | link.
The example includes a pacing protocol and model ion-channel conductance modifications that result in a stable spiral wave.
This example uses a specially annotated CellML file, and illustrates how to change parameters in a
cell model in an automated manner in the associated cell factory at Plos2013/src/SpiralWave.
This test can be run in parallel and will speed up well proportional to the number of processors you have. e.g.
scons build=GccOptNative_4 test_suite=projects/project_Plos2013/test/TestSpiralWaveLiteratePaper.hppThe easiest way to visualize this simulation is with meshalyzer.
Code overview
The first thing to do is to include the necessary header files.
#include <cxxtest/TestSuite.h>

#include "MonodomainProblem.hpp"
#include "DistributedTetrahedralMesh.hpp"
#include "LuoRudyCellFactory.hpp" // This is defined in this project 'src' folder, the rest are in Chaste 3.1.

#include "PetscSetupAndFinalize.hpp"
Having included all the necessary header files, we proceed by defining the test class.
class TestSpiralWaveLiteratePaper : public CxxTest::TestSuite
{
public:
    void TestSpiralWaveSimulation() throw (Exception)
    {
We will auto-generate a mesh this time, and pass it in, rather than provide a mesh file name. This is how to generate a cuboid mesh with a given spatial stepsize h
        DistributedTetrahedralMesh<2,2> mesh;
        double node_spacing_in_mesh = 0.015;
        double mesh_width = 3; // cm
        mesh.ConstructRegularSlabMesh(node_spacing_in_mesh, mesh_width /*length*/, mesh_width /*width*/);
Set the simulation duration, etc.
One thing that should be noted for monodomain problems, the intracellular
conductivity is used as the monodomain effective conductivity (not a
harmonic mean of intra and extracellular conductivities).
So if you want to alter the monodomain conductivity call
HeartConfig::Instance()->SetIntracellularConductivities()
        HeartConfig::Instance()->SetSimulationDuration(500); //ms
        HeartConfig::Instance()->SetOutputDirectory("Plos2013_SpiralWave");
        HeartConfig::Instance()->SetOutputFilenamePrefix("results");
        HeartConfig::Instance()->SetOdePdeAndPrintingTimeSteps(0.01, 0.01, 1);
“Cell factory” objects have the task of providing a cardiac cell model for each node of the mesh. When a factory constructs a cell it allocates an ODE solver and a stimulus. In this case we have written a cell factory to provide the necessary S1-S2 style stimulus to initiate a spiral wave. This class can be found in the project’s ‘src’ folder.
LuoRudyCellFactory cell_factory(mesh_width,mesh_width);Now we declare the problem class, MonodomainProblem<2>.
To do a bidomain simulation is as simple as changing the following line to BidomainProblem<2>.
MonodomainProblem<2> monodomain_problem( &cell_factory );If a mesh-file-name hasn’t been set using HeartConfig, we have to pass in
a mesh using the SetMesh method (must be called before Initialise).
monodomain_problem.SetMesh(&mesh);SetWriteInfo is a useful method that means that the min/max voltage is
printed as the simulation runs (useful for verifying that cells are stimulated
and the wave propagating, for example) (although note scons does buffer output
before printing to screen)
monodomain_problem.SetWriteInfo();Finally, call Initialise and Solve
        monodomain_problem.Initialise();
        monodomain_problem.Solve();
    }
};
Code
The full code is given below
File name TestSpiralWaveLiteratePaper.hpp
#include <cxxtest/TestSuite.h>

#include "MonodomainProblem.hpp"
#include "DistributedTetrahedralMesh.hpp"
#include "LuoRudyCellFactory.hpp" // This is defined in this project 'src' folder, the rest are in Chaste 3.1.

#include "PetscSetupAndFinalize.hpp"

class TestSpiralWaveLiteratePaper : public CxxTest::TestSuite
{
public:
    void TestSpiralWaveSimulation() throw (Exception)
    {
        DistributedTetrahedralMesh<2,2> mesh;
        double node_spacing_in_mesh = 0.015;
        double mesh_width = 3; // cm
        mesh.ConstructRegularSlabMesh(node_spacing_in_mesh, mesh_width /*length*/, mesh_width /*width*/);
        HeartConfig::Instance()->SetSimulationDuration(500); //ms
        HeartConfig::Instance()->SetOutputDirectory("Plos2013_SpiralWave");
        HeartConfig::Instance()->SetOutputFilenamePrefix("results");
        HeartConfig::Instance()->SetOdePdeAndPrintingTimeSteps(0.01, 0.01, 1);

        LuoRudyCellFactory cell_factory(mesh_width,mesh_width);

        MonodomainProblem<2> monodomain_problem( &cell_factory );

        monodomain_problem.SetMesh(&mesh);

        monodomain_problem.SetWriteInfo();

        monodomain_problem.Initialise();
        monodomain_problem.Solve();
    }
};