Title here
Summary here

ApPredict is a free open source program for prediction of action potential changes under drug-block of ion channels. The ion channel block is modelled as conductance block, see Gary Mirams’ book chapter for details of this, and it can be used with a number of action potential models (specified using CellML), different pacing rates, and blockade of the following ion channels can be included:
If you have any questions/comments, please get in touch with
gary.mirams@nottingham.ac.uk.
Web Portal
A web-based portal interface to this program is now available: https://cardiac.nottingham.ac.uk/ActionPotentialPortal/ (feedback welcome), if you use this you can ignore all the instructions below – it’s all set up for you!
For an overview of what ApPredict is doing, why, and how well it is performing, please see the user guide which is hosted on Figshare and the ApPredict paper.
N.B. you don’t need to do any of the below to use the web portal version of ApPredict.
Although you may want to read the Annotating CellML section if you want to upload your own models to the portal.
ApPredict requires a ‘Code User’ or ‘Code Developer’ version of Chaste to be installed and compiled. See GettingStarted for a guide on what we mean, and how to do this.
A stable version of ApPredict, compatible with the latest release of Chaste, is available either to download, or as a tag within github.
Download both:
To get both the release of Chaste and ApPredict do:
git clone -b 2024.1 https://github.com/Chaste/Chaste.git
cd Chaste/projects
git clone --recursive -b v2024.1 https://github.com/Chaste/ApPredict.gitAlternatively the development version can be downloaded using git, using the following instructions (as per the Repository Access Guide):
git clone -b develop https://github.com/Chaste/Chaste.gitIf you are not using the Ubuntu package then the environment settings will need to be updated to give the correct paths to all of Chaste’s dependencies. See the Developer Install Guide.
then similarly in the same folder
git clone --recursive https://github.com/Chaste/ApPredict.git
cd Chaste/projects
ln -s ../../ApPredict
cd ..
The project can be kept up to date by simply navigating to the Chaste folder
and running
git pull
cd projects/ApPredict
git pull
The External Developer Guide provides a guide as to the latest revision that passed all tests.
See Step 4 of the user project guide for instructions on how to compile ApPredict (where <your_project_name> is ApPredict).
./projects/ApPredict/apps/src/ApPredictThe executable will then display a list of command line arguments.
(N.B. you may have to add Chaste libraries under the Chaste libs folder to your LD_LIBRARY_PATH variable)
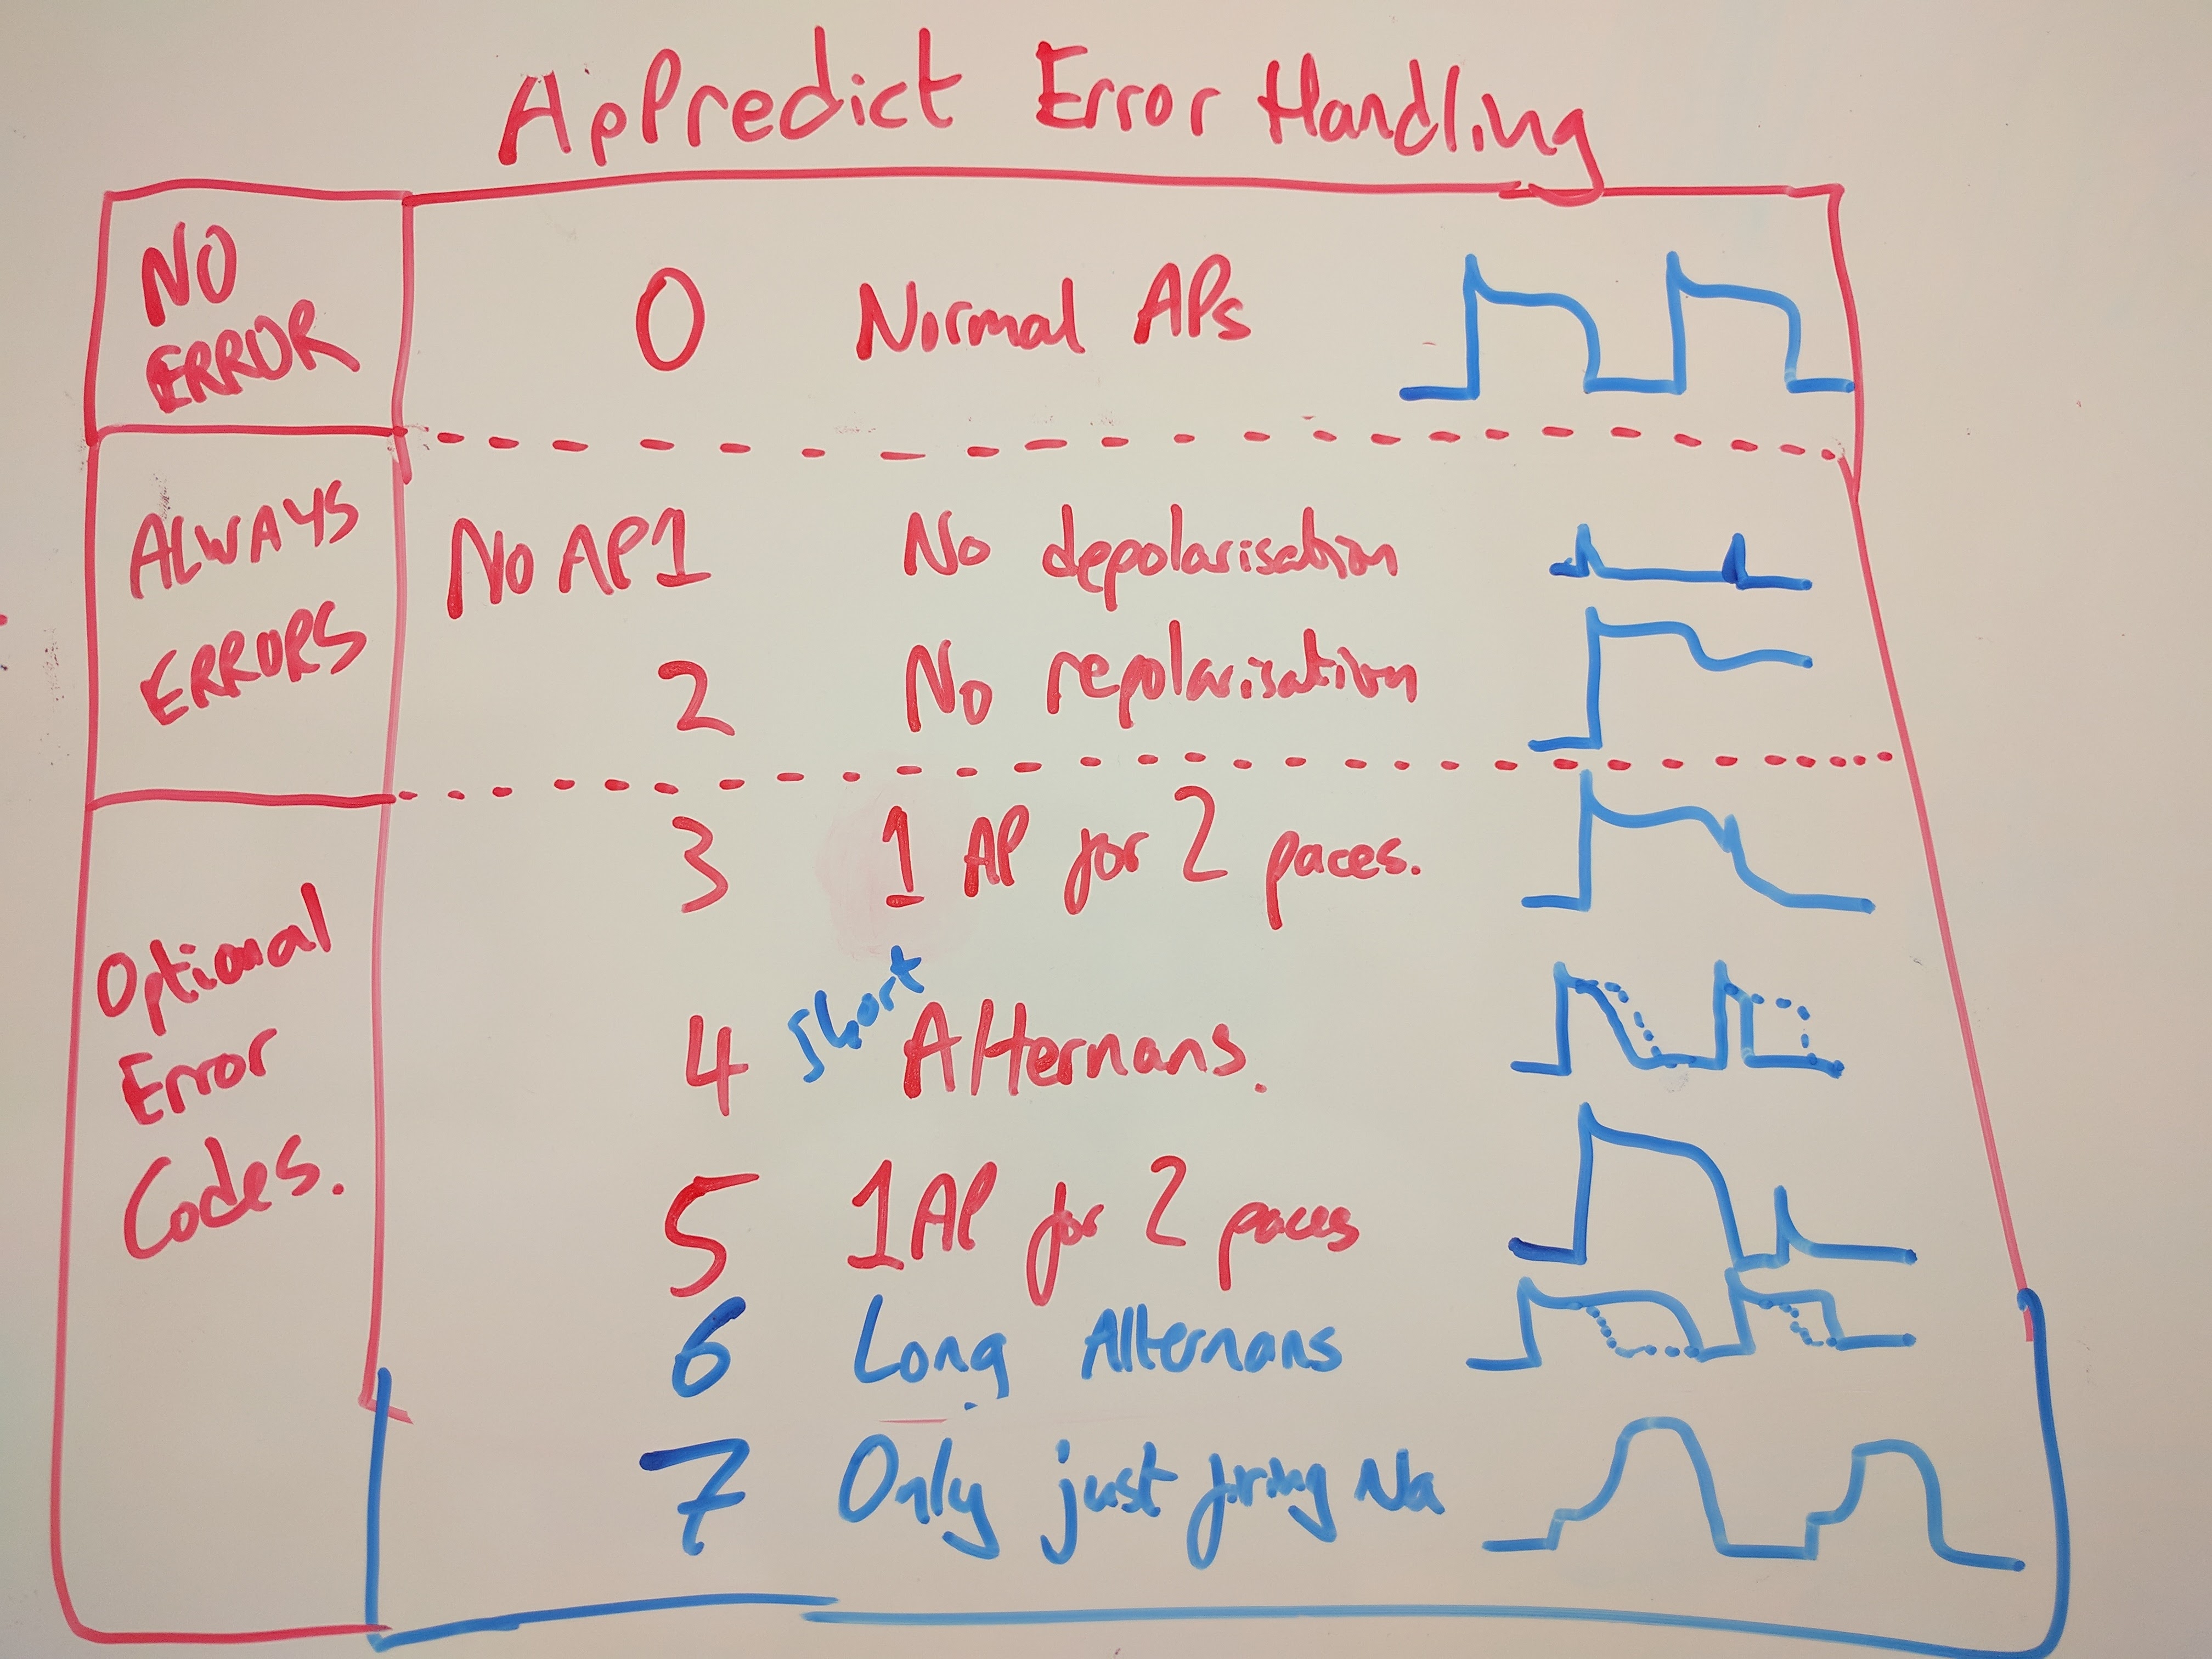
When you start blocking ion channels, various funny things can happen and lead to error codes in action potential evaluation. Here is a schematic of the errors you can get back from ApPredict’s main methods.
Model Tagging
Whichever method you use, you will need to “tag” the CellML file with our RDF metadata, to tell ApPredict which variable represents which current, etc. See the next section for instructions on how to do this.
There are a number of ways to use CellML models with ApPredict:
Pre-compiled: the fastest method is to provide a CellML file when building the ApPredict executable. This is then automatically converted to C++ hpp and cpp files just once, at ApPredict’s compile time, and compiled-in to the ApPredict library for instant use.
To do this, you simply need to put your CellML file into your local clone of the ApPredict/src/extra_models folder (here on github), before beginning the compilation process (re-running cmake and make). These pre-compiled models can then be used by providing the argument --model <name of cellml file (without .cellml on the end)>.
A handful of the most commonly-used models for drug studies are already compiled into ApPredict, and these can be accessed by the --model N argument, where N is the model number (or their name as above). These models are:
| N | Model Name | species and heart region | Reference |
|---|---|---|---|
| 1 | Shannon 2004 | rabbit ventricle | doi: 10.1529/biophysj.104.047449 |
| 2 | Ten Tusscher 2006 | human ventricle (epi) | doi: 10.1152/ajpheart.00109.2006 |
| 3 | Mahajan 2008 | rabbit ventricle (endo) | doi: 10.1529/biophysj.106.98160 |
| 4 | Hund-Rudy 2004 | dog ventricle | doi: 10.1161/01.cir.0000147231.69595.d3 |
| 5 | Grandi 2010 | human ventricle (epi) | doi: 10.1016/j.yjmcc.2009.09.019 |
| 6 | O’Hara-Rudy 2011 | human ventricle (endo) | doi: 10.1371/journal.pcbi.1002061 |
| 7 | Paci 2013 | human stem-cell derived myocyte (ventricular-like) | doi: 10.1007/s10439-013-0833-3 |
| 8 | Dutta (O’Hara-Rudy CiPA v1) 2017 | human ventricle (endo) | doi: 10.3389/fphys.2017.00616 |
Runtime conversion and compilation: the most flexible method is to convert a CellML file to C++ at runtime, and compile it on the fly. This is slower, but allows any CellML file to be used with a pre-existing ApPredict binary executable, without recompiling Chaste and ApPredict. Although note you do need a working Chaste installation/dependencies and source tree to do the on-the-fly compilation step.
To do this option, simply provide the argument --model <relative or absolute path to cellml file (including .cellml on the end)>.
Since different CellML files have variables with different names repesenting the same thing (e.g. V, E, Vm, voltage, etc. for trans-membrane voltage), and different models have different currents available, it is necessary to tag each CellML file with metadata to tell ApPredict which variable represents which current, etc.
For basic model conversion to Chaste C++ code, the following tags are needed:
| Tag Name | Description |
|---|---|
membrane_voltage | The variable representing the membrane voltage. |
membrane_stimulus_current | The variable representing the stimulus current. For ‘square wave’ stimuli, we further tag the properties of the current. This is so the hard-coded stimulus can be removed and replaced by a Chaste Simulus class with the CellML file’s defined magnitude and duration, but then the previously-hardcoded period can be changed by ApPredict as requested by the user with the --pacing-freq argument. |
membrane_stimulus_current_period | The variable representing the stimulus current period (e.g. 1000ms for 1Hz pacing). |
membrane_stimulus_current_amplitude | The variable representing the stimulus current magnitude/amplitude. Sign conventions should be sorted out automatically by the chaste_codegen CellML->C++ converter… |
membrane_stimulus_current_duration | The variable representing the stimulus current duration (the length of the square wave applied at each stimulus). |
membrane_capacitance | The variable representing the membrane capacitance, sometimes needed in units conversion (not required if the model already has currents in units of “per farad”) |
time | The variable representing time. |
Here is a table of tags for each of the currents that ApPredict can apply block to, roughly in order of importance or screening prevalance:
| Current | Channel | Gene | Description | Metadata Tag |
|---|---|---|---|---|
| IKr | Kv11.1 | hERG or KCNH2 | Rapid delayed rectifier potassium current | membrane_rapid_delayed_rectifier_potassium_current_conductance or membrane_rapid_delayed_rectifier_potassium_current_conductance_scaling_factor |
| ICaL | Cav1.2 | CACNA1C | Long-lasting (L-type) calcium current | membrane_L_type_calcium_current_conductance or membrane_L_type_calcium_current_conductance_scaling_factor |
| INa | Nav1.5 | SCN5A | Fast sodium current | membrane_fast_sodium_current_conductance or membrane_fast_sodium_current_conductance_scaling_factor |
| INaL | Nav1.5 | SCN5A | Late/Persistent sodium current | membrane_persistent_sodium_current_conductance or membrane_persistent_sodium_current_conductance_scaling_factor |
| IKs | Kv7.1 | KCNQ1/minK | Slow delayed rectifier potassium current | membrane_slow_delayed_rectifier_potassium_current_conductance or membrane_slow_delayed_rectifier_potassium_current_conductance_scaling_factor |
| Ito (fast*) | Kv4.3 | KCND3 | (Fast*) transient outward potassium current | membrane_fast_transient_outward_current_conductance or membrane_fast_transient_outward_current_conductance_scaling_factor.*For this current it is not entirely clear whether a model with just a single Ito (perhaps including other Kv4.x and representing both fast/slow components) should be blocked in exactly the same way as the typical screening is on the genes/channels that seem to produce the ‘fast’ Ito, but ApPredict will apply the conductance scalings to the complete transient outward current tagged with membrane_transient_outward_current_conductance or membrane_transient_outward_current_conductance_scaling_factor if the fast variant doesn’t exist, and print out a warning that it did this. |
| IK1 | Kir2.1 | KCNJ2 | Inward rectifier potassium current | membrane_inward_rectifier_potassium_current_conductance or membrane_inward_rectifier_potassium_current_conductance_scaling_factor |
All the other available optional tags are in the oxmeta ontology, where there are some nice ‘ontology’ features like Chaste being able to put in checks that anything the ontology identifies as a probability (a gating variable or Markov state) stays in $[0,1]$, or anything labelled as a concentration stays $\geqslant 0$, etc.
Conductance Tagging
Note in all of these, the tags are really intended to represent the “maximal conductance” (not scaled down by open probability as “conductance” really is, stictly speaking) - but “maximal” was not included in the already wordy labels.
For ApPredict’s purposes it doesn’t matter whether a parameter is tagged with the *conductance or *conductance_scaling_factor tags, as long as either tag is applied to some parameter that scales the total conductance of a current.
e.g. in the case of an ohmic current (same tagging principles apply to GHK fluxes) the current is given by:
$ I = g_{\text{max}} \times \text{OpenProb} \times (V-\text{Nernst})$
Here, as long as $g_{\text{max}}$ is a simple scalar parameter (just a number) we could tag it as *conductance or *conductance_scaling_factor and ApPredict will be happy with that. We could also introduce $s_{\text{factor}}$ (a number that defaults to 1):
$ I = s_{\text{factor}} \times g_{\text{max}} \times \text{OpenProb} \times (V-\text{Nernst})$
and label it with either tag, and ApPredict will also behave correctly.
If however we have a more complex expression, where $g_{\text{max}}$ is a function of some other things e.g.
$ g_{\text{max}} = g_{\text{factor}} \times \sqrt{\frac{K_o}{5.4}} $
$ I = g_{\text{max}} \times \text{OpenProb} \times (V-\text{Nernst}) $
Then we may have (appropriately) tagged $g_{\text{max}}$ as *conductance, but ApPredict cannot scale a formula like this, it wants to read a default parameter and apply dose-response scaling to it. So here we would need to tag $g_{\text{factor}}$ as *conductance_scaling_factor so that ApPredict can safely scale the conductance. You may even need to introduce a new variable for $g_{\text{max}}$ that is a function of $g_{\text{factor}}$ so that both can be tagged properly.
The distinction is used by the Web Lab because certain protocols might set maximal conductance to a fixed value (for comparison of channel kinetics between models) and Web Lab will auto-replace the $g_\text{max}$ equation with a fixed value.
The tags themselves take the form of RDF metadata (but that’s not so important to know!), and the list of recognised tags is given in our oxmeta ontology, which is shared by Chaste, ApPredict and Web Lab.
There are a number of ways to do this:
Easiest: Some ‘heavily-annotated’ models that will probably already have all the necessary metadata annotated/tagged are available at https://github.com/Chaste/cellml. So check here first as it may contain the model you want, already tagged with the necessary metadata for ApPredict to work with it.
Fairly Easy: the Cardiac Electrophysiology Web Lab contains an annotation tool, so that you can drag and drop metadata terms onto variables/parameters in the CellML model. To do this you’ll need to register then contact gary.mirams@nottingham.ac.uk to ask for ‘Modeller’ permissions for the account you just created, and then when we’ve granted that you can upload your CellML model and annotate it.
More involved: ‘manual’ annotation can be done by inserting some text into the CellML files themselves. See Code Generation from CellML as well as the ontology terms you will want to use above, and you’ll want to look at some examples of how the metadata is inserted into the CellML file by referring to the cmeta:id attributes on each variable/parameter in the CellML file. Have a look at the heavily-annotated files in https://www.github.com/Chaste/cellml to see exactly how this is done.
LookupTableGenerator (for uncertainty quantification calculations) is now a bit better at detecting ‘No depolarization’ because it does a pre-run with sodium channel blocked and sets the threshold for an action potential to be higher than the voltage achieved here.--saturation-herg or --saturation-na etc.. The value(s) that follow are given as percentages, where 0% is the default (full block of the ion channel), 50% would mean an infinite amount of drug can only halve the conductance. Additionally, this allows agonists (activators) to be modelled by specifying saturation levels above 100% (in which case the IC50 is really an EC50, but interface still says IC50).